
June 9, 2011:
The next demo in my mixed-media class was to create even more texture to the spackle mix with the addition of sand, pebbles, grit or other similar things.
The trick is to mix the plaster, acrylic medium and addition thoroughly. Apparently, just sprinkling the sand or grit on top does NOT work. Jeanne made up several samples of these for us to play with.
painting on wood panel with spackle/medium/grit texture applied with a palette knife

I loved the look of grit in the spackle, and went a bit nuts scraping them with a palette knife to form streaky lines. In the process I managed to cover up my worst image transfer as well the bad edges of the other two.
Jeanne had me smear the plaster edges into the painting, as a way of blending the texture into the rest of the painting. She also muttered something about the visual elements (the square wood transfers; the wildly organic texture) being potentially difficult to work with…
During the week: mixing up spackle textures on my own
At home I mixed some ‘Patching Plaster’ that was lying around with acrylic medium for my acrylic/spackle mix. This particular mix turned out to be a little runny, not much thicker than gesso. NOTE: Runny mix turned out to be a problem for several students; our instructor suggested using gel or heavy gel for a thicker mix.
Jeanne had recommended pet/aquarium stores as the best place to find pebbles, sand and grit, but the nearest shop didn’t carry anything but fish food. I ended up having to drive halfway across town to find a store that carried fine sand, but they only had a 10lb bag that cost $19 with tax. Ouch…
In the ‘spackle’ class one of the students made up sheets of samples of each type of spackle mix with labels. I thought that this was a great way to keep track, and decided to incorporate the various things I’m learning into studies of rocks.
Spackle/medium/fine sand
The top rock is a combo of a plain spackle/medium (the whitish sections) and a sand/spackle/medium mix (the gray). The bottom rock is sand/spackle/medium mix (the rust) and very thick spackle/gel mix pressed through an ex-sequin ‘stencil’ (whitish bits).
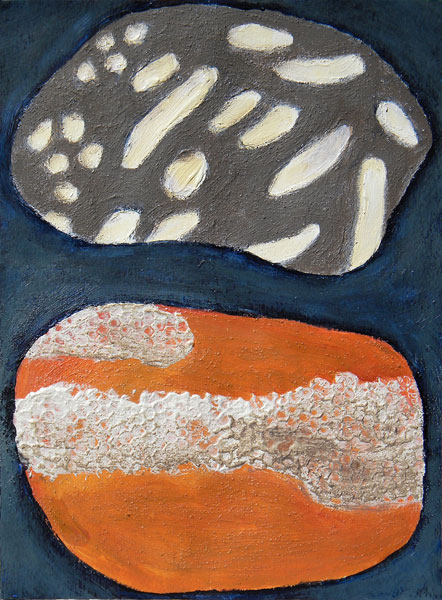
studies of rocks using texture
Spackle/heavy gel/grit
This rock painting started with gesso applied on watercolour paper, followed by a reddish glaze (medium mixed with various red paints), and then an image transfer that was surrounded by a spackle/heavy gel/grit mixture applied thickly with a palette knife.

Cracking spackle mix
If you dry a very thick spackle/gel mix quickly, either by blow-drying it or by putting it outside in the hot sun, the surface will crack in an intriguing way. The rock below has a yellowy glaze applied over the cracked spackle. If you DON’T want the crackle, apply in thinner coats, or dry in a very cool place.

spackle cracked by drying out in the hot sun
Mixed Media Class Experience:
- My first mixed media class – selecting images suitable for transfer
- I am frantically wondering, “where’s the undo button?”
- Mistakes and more mistakes (using my scribbles painting as an example)
- How to do an image transfer, method # 1
- How to do an image transfer, method # 2
- Pressing objects into spackle to create textures for your paintings
Our super instructor’s site: http://jeannekrabbendam.com/ On her site she has her work and offers lots of different workshops and courses.


Pingback: Mixed-Media Painting Class 2: Using Spackle to Create Textures (Plus a Few Struggles) | Elizabatz Gallery·